In our experience working with SMB and enterprise IT teams, it is often unknown just how far and wide their Active Directory (AD) environment truly is and how many possible attack paths exist for a would-be threat actor. This is true because it's a non-trivial activity to sit down and map these environments out in a way that makes it possible to begin hardening and mitigating attack paths.
Well, what better way to do it than the same way attackers do? That's exactly what this post aims to achieve -- assist IT teams through the process of enumerating Active Directory and diagramming attack paths, using the same tools many adversaries would use.
Intro to Bloodhound
Bloodhound is an open source tool from Specter Ops that rapidly enumerates many details of an Active Directory environment to enable generating maps and diagrams highlighting key weaknesses or attack paths.
Pulled straight from the GitHub repo:
BloodHound uses graph theory to reveal the hidden and often unintended relationships within an Active Directory or Azure environment. Attackers can use BloodHound to easily identify highly complex attack paths that would otherwise be impossible to quickly identify. Defenders can use BloodHound to identify and eliminate those same attack paths. Both blue and red teams can use BloodHound to easily gain a deeper understanding of privilege relationships in an Active Directory or Azure environment.
For those interested in a paid enterprise version, they have such an offering, but we have gone through the trouble of building a VM to enable fast and easy use of the free and open source version of Bloodhound.
Let's Do It!
While you can easily follow the docs and install Bloodhound and its dependencies on your own, you'll find that your AV/EDR will not play nicely with these tools; not because they are malware, but because they are commonly abused by adversaries to do exactly what we want to do--enumerate AD for attack paths. For this reason, it's far easier to run as much of this as we can in a VM to avoid AV issues.
The VM we've built is a simple Ubuntu Desktop 20.04 x64 system with only default packages installed. The only thing we've added is neo4j, the backend database for Bloodhound, and the Bloodhound UI package for Linux. The VM is configured with a "host-only" network adapter so it cannot reach the internet unless you manually change the NIC to allow this. Again, you do not have to use this VM, but it will make life a bit easier as you do not have to install the neo4j service permanently on a production system nor fight with AV constantly about the Bloodhound GUI.
- Download and unzip the pre-configured Ubuntu 20.04 x64 VM and start it up.
- Login with the following credentials
- Username: user
- Password: password (feel free to change)
- Once logged in, run Bloodhound-GUI.sh on the Desktop to immediately fire up Bloodhound.
- While the GUI should automatically login to the backend database, the credentials are
- Username: neo4j
- Password: bloodhound
- If you would rather run the viewer client on your host, you can do this by connecting to the IP address of the VM on port 7687 using the credentials above. Just note that you will likely need an AV exclusion because Bloodhound is a commonly abused tool.
- While the GUI should automatically login to the backend database, the credentials are
- This GUI is simply the viewer for collected datasets. Next step is to perform a collection of our environment so we can start plotting interesting data
- Login with the following credentials
- Gather Active Directory data using SharpHound
- This tool is best run from a domain-joined system, but no special privileges are needed.
- SharpHound itself is not malware, its simply an enumeration tool. You may need to create an AV exclusion for this tool since, once again, it's commonly abused by attackers so there are AV signatures for it.
- To bypass browser warnings about the download, try using PowerShell instead of a browser to download it
- If you're using Defender, this PowerShell script will help automate the process. Since we're making changes to Defender, it requires running as Admin.
- Execute SharpHound to gather AD information
C:\path\to\SharpHound.exe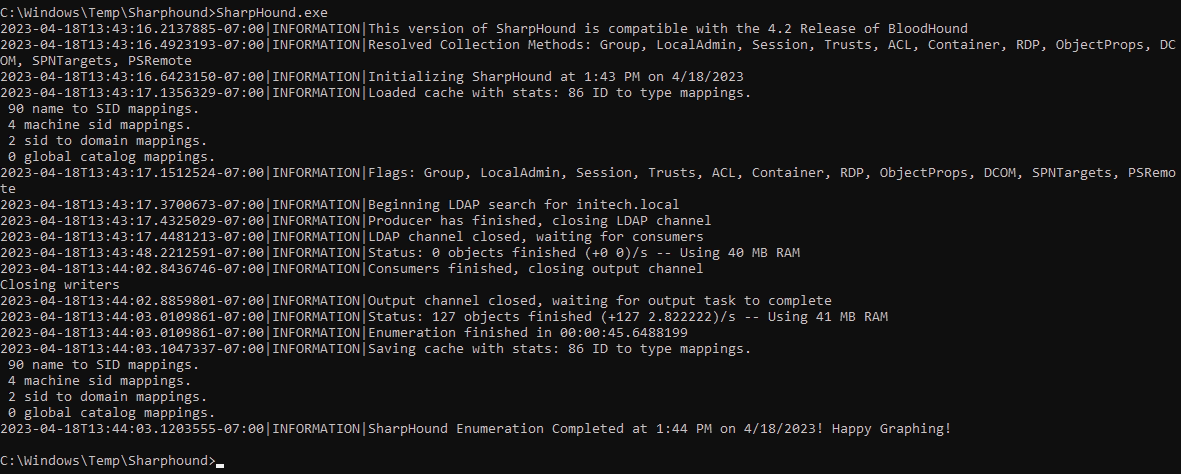
- Once SharpHound is finished running, it will generate a .ZIP file in the same directory it was run from.
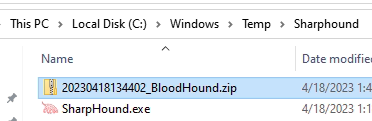
- Copy/paste this ZIP file anywhere onto the Ubuntu VM
- From the File Browser, drag & drop the ZIP into the Bloodhound GUI

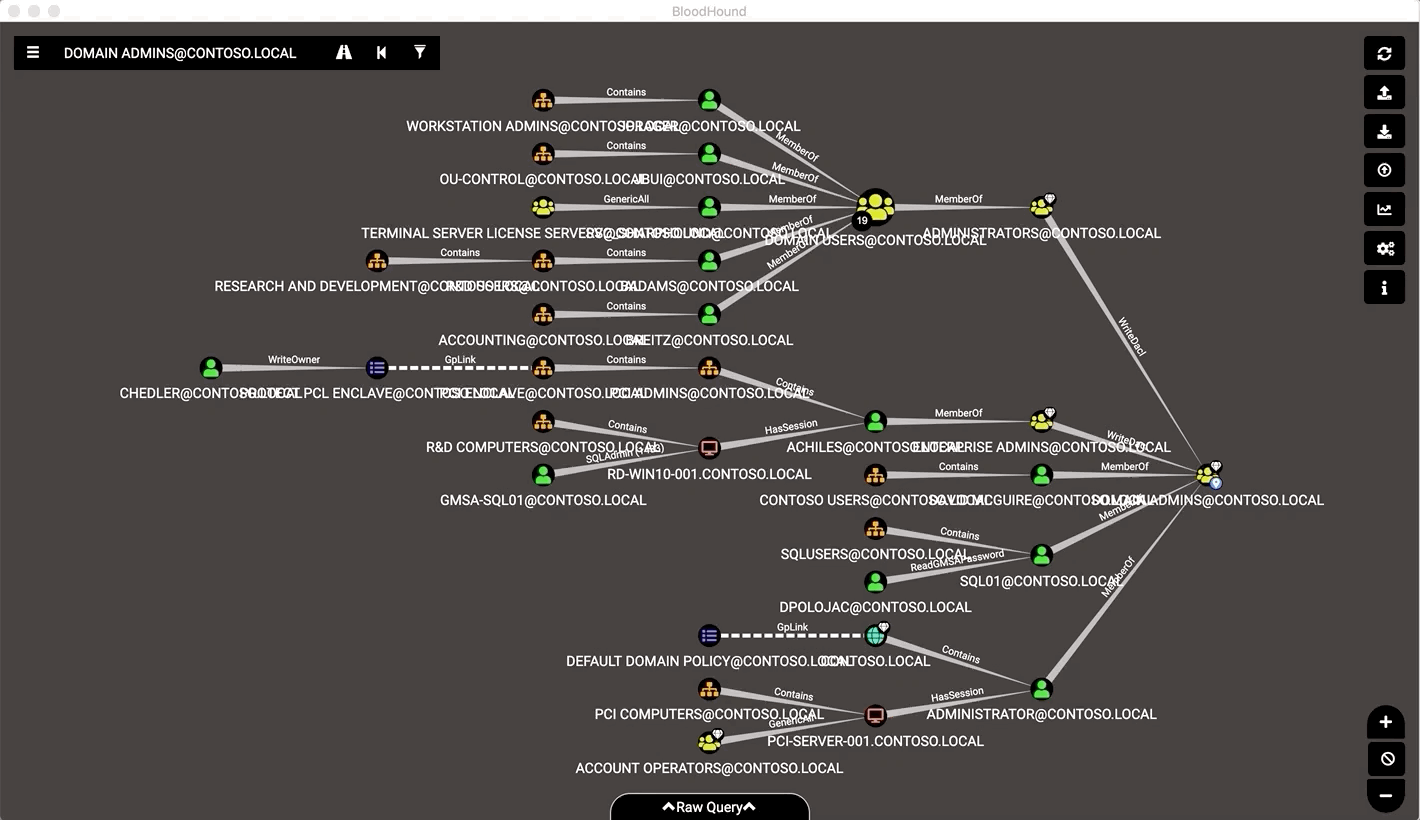
- We are now ready to explore the environment and look for attack paths.
- Interpret the Bloodhound data with built-in queries
-
-
- Click on any node on the diagram to get information about the node

- Spend more time with the built-in queries, such as "List all Kerberoastable accounts" which provides path for non-privileged users to gain privileged account credentials. Learn more about Kerberoasting from Microsoft.
- For questions or issues, check out the Bloodhound docs.
- Click on any node on the diagram to get information about the node
-
While the outputs from Bloodhound are very useful for informing defenders, it is also important to know how to harden against tools like Bloodhound from being used against us as well. Microsoft published some excellent guidance on this here.
Need More Assistance?
If this type of guidance is useful to you, consider partnering with Recon by leveraging our Managed Detection & Response offering to gain full access to our team of analysts for consistent advisory services in addition to our phenomenal SOC-as-a-Service capabilities.
